2 Kasım 2019 Cumartesi

Apple Magic Mouse Windows 10 Tanıtma / Using Apple Magic Mouse On The Windows 10

Apple Magic mouse ve scrool özelliğini Windows 10 işletim sisteminde yapılması gerekenler aşağıdaki gibidir.

Öncelikle aşağıdaki linkten Boot Camp Destek Yazılımını indirin.
https://support.apple.com/kb/DL1837?locale=tr_TR

İndirdiğiniz dosyayı bir klasöre açın.

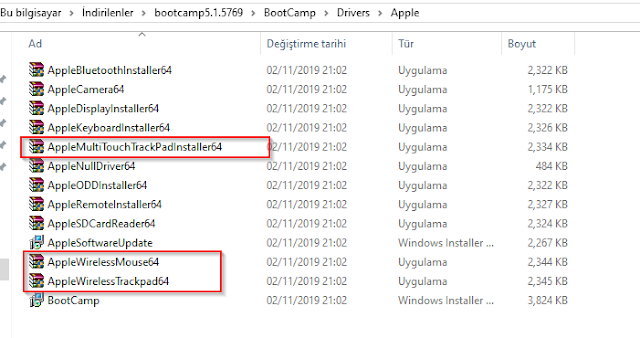
Yukarıdaki resimde işaretlediğim dosyaları sırayla bilgisayarınıza kurun. Tebrikler kurulumu başarıyla tamamladınız.

For English :

If you want to use Apple Magic mouse on the Windows 10, the following under the steps.

First, step download to the below link.
https://support.apple.com/kb/DL1837?locale=tr_TR


Extract to downloaded files.

Install the files marked in the picture belove. Congratulations, completed your mouse installing.
Share:

3 Ekim 2019 Perşembe

Remote Kill Process - Remote App Kill

Powershell

Assuming you have an account with the requisite permissions, and have configured Powershell for remote use (not covered in this answer, but here's a free e-book from Don Jones covering how to get set up,) you can use one of several Cmdlets to remotely kill processes.

Stop-Process via Invoke-Command

You should be able to use Stop-Process along with an Invoke-Command (or by opening a more permanent remote session).
Invoke-Command -ComputerName RemoteComputer -ScriptBlock {Stop-Process processname}
This would be my preference, but requires some configuration in advance, so is not ideal in every situation.

Built-in Solutions

Taskkill.exe

Taskkill is provided on recent Windows machines, and can be used remotely with the /s parameter.
Example:
taskkill /s remotecomputer /pid processID

Sysinternals Tools

You can also use either of PSKill or PSExec (available at live.sysinternals.com) to terminate processes.

PSKill

Similar to Taskkill, but not provided on Windows machines by default.
Example:
pskill \\remotecomputer <process ID | name>

PSExec

Using PSExec, on the other hand, you can run any command you would normally use to manage processes locally.
Example:
psexec \\remotecomputer taskkill /pid processID


0
You can run this command from cmd or the start menu:
taskkill /f /im name.exe 
This also has a /S parameter to allow you to set the system to connect to. So you will be able to:
taskkill /s remoteserver /f /im name.exe
To find name.exe,
tasklist
will give you a chart with all the processes, the names, the executable (name.exe) and the PID [process ID].

Share:

2 Ağustos 2019 Cuma

Outlook 2013 - 2016 NK2 Otomatik Adres Tamamlama Yeni Profile Taşıma

Office 2013,2016 için;

Aşağıdaki uzantıyı Başlat-Çalıştır(windows+R) kopyala-yapıştır yapıp entera basın,

C:\Users\%username%\AppData\Local\Microsoft\Outlook\RoamCache

Aşağıdaki gibi dat dosyalarının oldugu klasör gelecektir,


Daha önceki otomatik tamamlama bilgilerini içeren dosya boyutu en yüksek olandır. Yüksek boyuttaki  dat dosyası eski otomatik tamamlama kişilerinizdir. bende 970 Kb olan eski kayıtlı kişileriminin bulunduğu dosyadır. Yukarıdaki resimde görünen 1 kb lık diğer dosyalar ise, eski profil dosyalarıdır. Bu dosyalar gereksizdir. Güncel tarih ve boyuta göre sıralayarak en güncel profil dosyanızı kolay bir şekilde bulabilirsiniz.
Yeni kullanıcı profilinizin olduğu yerde bulunan 1 kb en güncel tarihli dosyanın adını kopyalayın. Sonrasında bu 1 kb lık dosyanın sonunda _old yazarak adını değiştirin. 
Eski 970 Kb lık profil dosyanıza 1 Kb lık dosyanızın olduğu yeni bilgisayarınıza kopyalayın. Ardından 1 Kb dosyanızın ismini sonuna eklediğiniz _old ismi olmadan bu yeni dosyanızın ismi olarak değiştirin. 
Not: Bu işlemleri yaparken outlook kapalı olmalıdır!
Share:

30 Temmuz 2019 Salı

SQl Defragmantasyon Otomatik Onarım Scripti

--Defragmantasyon oranı sorgulama ve otomatik düzeltme
Use TEST_DB
GO


DECLARE @Table VARCHAR(255)
DECLARE @cmd NVARCHAR(500)
DECLARE @fillfactor INT
SET @fillfactor = 90

 DECLARE cr_Kayitlar CURSOR FOR

 SELECT OBJECT_NAME (ps.object_id) as ObjectName --,ps.avg_fragmentation_in_percent
 FROM sys.dm_db_index_physical_stats (DB_ID(), NULL, NULL , NULL, 'LIMITED') ps
  INNER JOIN sys.indexes i ON i.object_id=ps.object_id and i.index_id=ps.index_id
  WHERE avg_fragmentation_in_percent > 5 AND ps.index_id > 0
  ORDER BY avg_fragmentation_in_percent desc
 OPEN cr_Kayitlar;
 FETCH NEXT FROM cr_Kayitlar INTO @Table;
 WHILE @@FETCH_STATUS=0
  BEGIN
   --ALTER INDEX ALL ON (@Table) REBUILD
   SET @cmd = 'ALTER INDEX ALL ON ' + @Table + ' REBUILD WITH (FILLFACTOR = ' + CONVERT(VARCHAR(3),@fillfactor) + ')'
EXEC (@cmd)

   --ALTER INDEX ALL ON @TabloAdi REORGANIZE --WITH (ONLINE = ON)
  FETCH NEXT FROM cr_Kayitlar INTO @Table;
 END
CLOSE cr_Kayitlar
DEALLOCATE cr_Kayitlar
Share:

30 Haziran 2019 Pazar

Event 36888, Schannel Windows errors

FOR ENGLISH SOLUTION

This could fix the error:  (run: gpedit.msc)
Go to Computer Configuration Administrative Templates > System > Distributed COM > Application Compatibility and enable "Allow local activation security check exemptions". 

Share:

Fix Error 1008 from Perflib open procedure of “CWindowsSystem32bitsperf.dll” failed


FOR ENGLISH

Copy the "bitsctr.h" file in the C:\Windows\Inf\BITS\
Paste here C:\Windows\Inf\BITS\0409

Right click on the Windows Powershell and select run as administrator. Run the following commands respectively.

unlodctr BITS
lodctr "C:\Windows\Inf\BITS\0409\bitsctrs.ini"


TÜRKÇE ÇÖZÜM

C:\Windows\Inf\BITS\ klasörü içerisindeki "bitsctr.h" dosyasını kopyalayıp C:\Windows\Inf\BITS\0409 klasörü içerisine yapıştırın.

Windows Powershell 'i üzerine sağ tıklayıp, yönetici olarak çalıştırın. Sırasıyla aşağıdaki komutları uygulayın.

unlodctr BITS
lodctr "C:\Windows\Inf\BITS\0409\bitsctrs.ini"


Share:

30 Mayıs 2019 Perşembe

VMware Workstation and Device/Credential Guard are not compatible

VMware Workstation and Device/Credential Guard are not compatible Problem Resolve. First you need to Disable Group Policy... for that search for "Run" and type "gpedit.msc" in that Goto Local Computer Policy - Computer Configuration - Administrative Templates - System - Device Guard - Turn on Virtualization Double click that .... and select "Disable" ... Go to Control Panel - Uninstall a Program - Turn Windows features on or off - (uncheck/turn off) Hyper-V. Click OK Select Do not restart. And then type the following cmds in cmd prompt.. to Delete the related EFI variables from the BCD file... Launch cmd as admin... bcdedit /create {0cb3b571-2f2e-4343-a879-d86a476d7215} /d "DebugTool" /application osloader bcdedit /set {0cb3b571-2f2e-4343-a879-d86a476d7215} path "\EFI\Microsoft\Boot\SecConfig.efi" bcdedit /set {bootmgr} bootsequence {0cb3b571-2f2e-4343-a879-d86a476d7215} bcdedit /set {0cb3b571-2f2e-4343-a879-d86a476d7215} loadoptions DISABLE-LSA-ISO,DISABLE-VBS bcdedit /set hypervisorlaunchtype off Restart your system ... Please visit http://www.vmware.com/go/turnoff_CG_DG for more details
Share:

12 Mart 2019 Salı

Apple Kablosuz bluetooth klavyemi Windows 10 Professional bilgisayarıma tanıttım.

Nasıl 1. Nesil Apple Kablosuz bluetooth klavyemi Windows 10 Professional bilgisayarıma tanıttım.
1 - Ayarlar Denetim Masasından Bluetooth'un açık olduğundan emin olun. "Bluetooth" kelimesini aradım ve "Aygıtlar ve Yazıcılar" altındaki "Bluetooth aygıtı ekle" yi tıkladım.
2 - Apple Kablosuz Klavyeyi KAPALI konuma getirdim (zaten kapalıysa devam et ..)
3 - Yeşil LED yanana kadar klavyedeki güç düğmesini basılı tuttum ve yanıp sönmeye başladım ... Bilgisayar ekranına şifre ekranı gelene kadar AÇMA TUŞUNU SÜREKLİ BASILI TUTUN!
4 - Ve eşleştirme kodu geldi, klavyedeki güç düğmesini basılı tutarken / ekrana gelen kodu girip enter tuşuna basın. ( ENTER TUŞUNA BASAN KADAR GÜÇ DÜĞMESİ BASILI OLACAK.)
5 - Eşleştirme tamamlandıktan sonra güç tuşundan elimi çektim. Yükleme tamamlandı ve bilgisayara sürücüler yüklendi.
Teşekkürler ve iyi şanslar,

I know this thread is old but this worked for me... currently typing on my (1st-gen) Apple Wireless Keyboard, Dell Notebook,  Windows 10 Pro.
1 - I'm sure you can use Bluetooth in the Settings app, but I used Control Panel. I searched for "bluetooth" and clicked "Add a Bluetooth device" under "Devices and Printers."
2 - I powered the Apple Wireless Keyboard OFF (if already off then proceed..)
3 - I held down the power button on the keyboard until the green LED came on AND started flashing... KEEP HOLDING THROUGHOUT PAIRING PROCESS!
4 - The pairing code FINALLY came up, and I was able to type in the code/hit enter (while still holding the power button on the keyboard).
5 - I let off of the power button upon pairing finalized, the computer installed drivers, and I typed this response!
Thanks and good luck,


Share:

Blog Arşivi