Windows Server etiketine sahip kayıtlar gösteriliyor. Tüm kayıtları göster

11 Nisan 2022 Pazartesi

GPO Fingerprint Enable - Group Policy ile Parmak İzi Aktif Etme

Enable all of these policies and set the registry key to enable the Windows 10 facial and fingerprint logon feature.


Group Policy settings:

Computer Configuration\Administrative Templates\System\Logon


Turn on convenience PIN sign-in (Enabled)

Computer Configuration\Administrative Templates\Biometrics


Allow the use of biometrics (Enabled)

Allow users to log on using biometrics (Enabled)

Allow domain users to log on using biometrics (Enabled)

Computer Configuration\Administrative Templates\Biometrics\Facial Features


Use enhanced anti-spoofing when available (Disabled)

Computer Configuration\Administrative Templates\Windows Hello for Business


Use a hardware security device (Enable)

Use biometrics (Enabled)

Group Policy Preference settings:


[HKEY_LOCAL_MACHINE\SOFTWARE\Policies\Microsoft\Windows\System]

“AllowDomainPINLogon”=dword:00000001 

Share:

4 Haziran 2020 Perşembe

Windows Zaman Damgali ping Bağlantı Testi / Windows Time Stamp ping Connection Test


WindowsPowerShell:
seçenek 1 / Option 1
 ping.exe -t COMPUTERNAME|Foreach{"{0} - {1}" -f (Get-Date),$_}  veya
 ping.exe -t 10.227.23.241 |Foreach{"{0} - {1}" -f (Get-Date),$_} >> Ping_IP.txt
seçenek 2 / Option 2
 Test-Connection -Count 9999 -ComputerName COMPUTERNAME | Format-Table @{Name='TimeStamp';Expression={Get-Date}},Address,ProtocolAddress,ResponseTime
 ping 10.0.0.1 | while read line; do echo `date` - $line; done
 @echo off

set /p host=host Address: 
set logfile=Log_%host%.log

echo Target Host = %host% >%logfile%
for /f "tokens=*" %%A in ('ping %host% -n 1 ') do (echo %%A>>%logfile% && GOTO Ping)
:Ping
for /f "tokens=* skip=2" %%A in ('ping %host% -n 1 ') do (
    echo %date% %time:~0,2%:%time:~3,2%:%time:~6,2% %%A>>%logfile%
    echo %date% %time:~0,2%:%time:~3,2%:%time:~6,2% %%A
    timeout 1 >NUL 
    GOTO Ping)
Share:

30 Haziran 2019 Pazar

Event 36888, Schannel Windows errors

FOR ENGLISH SOLUTION

This could fix the error:  (run: gpedit.msc)
Go to Computer Configuration Administrative Templates > System > Distributed COM > Application Compatibility and enable "Allow local activation security check exemptions". 

Share:

Fix Error 1008 from Perflib open procedure of “CWindowsSystem32bitsperf.dll” failed


FOR ENGLISH

Copy the "bitsctr.h" file in the C:\Windows\Inf\BITS\
Paste here C:\Windows\Inf\BITS\0409

Right click on the Windows Powershell and select run as administrator. Run the following commands respectively.

unlodctr BITS
lodctr "C:\Windows\Inf\BITS\0409\bitsctrs.ini"


TÜRKÇE ÇÖZÜM

C:\Windows\Inf\BITS\ klasörü içerisindeki "bitsctr.h" dosyasını kopyalayıp C:\Windows\Inf\BITS\0409 klasörü içerisine yapıştırın.

Windows Powershell 'i üzerine sağ tıklayıp, yönetici olarak çalıştırın. Sırasıyla aşağıdaki komutları uygulayın.

unlodctr BITS
lodctr "C:\Windows\Inf\BITS\0409\bitsctrs.ini"


Share:

1 Şubat 2017 Çarşamba

Dameware bağlantısı için gpo ayarları

Dameware group policy bağlantı ayarları için yapılması gerekenler.

Aşağıdaki portların Dameware remote control yazılımının uzaktan kurulabilmesi ve yönetimi için firewall üzerinde açılması gerekmekte.

Takdir edersiniz ki büyük networklerde bu işlemi manuel olarak yapmak oldukça zahmetli olacak. Bu nedenle bu işlemi Domain ortamında GPO ile kolaylıkla yapabiliriz.

Öncelikle Domain ortamında Group Policy editorümüzü açıp, Dameware isimli policy kuralımızı oluşturuyoruz. Kuralın yapılandırması resimlerde sırasıyla görünmektedir.

Açılması gereken portlar :
6129:TCP:192.168.1.0,192.168.10.0/24:Enabled:Dameware
6130:TCP:192.168.1.0,192.168.10.0/24:Enabled:Dameware
6132:TCP:192.168.1.0,192.168.10.0/24:Enabled:Dameware
6133:TCP:192.168.1.0,192.168.10.0/24:Enabled:Dameware
137:UDP:192.168.1.0,192.168.10.0/24:Enabled:Dameware


Share:

23 Şubat 2016 Salı

GPO With Outlook 2013

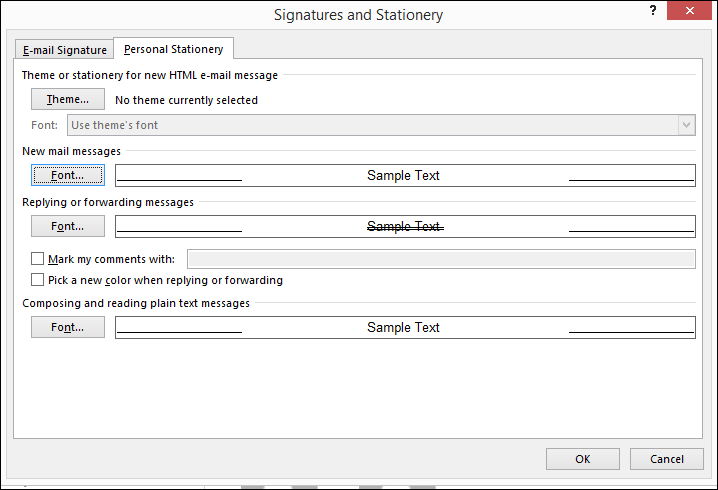
How To Configure Outlook 2013 Font Using Group Policy

font1
In this KB I’ll show you how to configure Outlook 2013 Font using Group Policy.
Using this method you can configure the following settings:
  • Default new email font colour and size
  • Default reply and forward colour and size
  • Email Comments
  • New Theme
The only requirement is Outlook 2013 Installed on a machine.
Note:
To start, Open Outlook 2013 and configure the font settings from the option menu.
font1
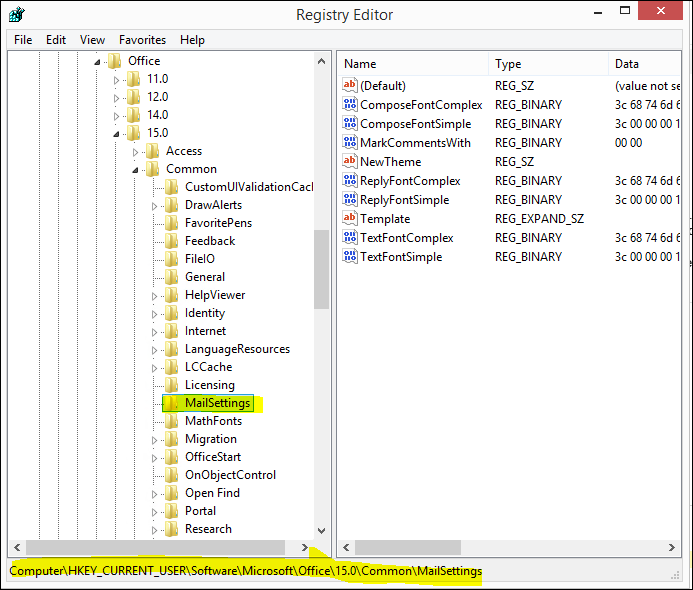
Step two, Open Registry editor from run menu, go to the path below and export the mail settings folder:
HKEY_CURRENT_USER\Software\Microsoft\Office\14.0\Common\MailSettings
font2
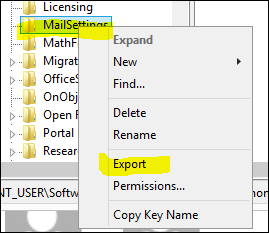
Export by right click on the MailSettings folder
font3
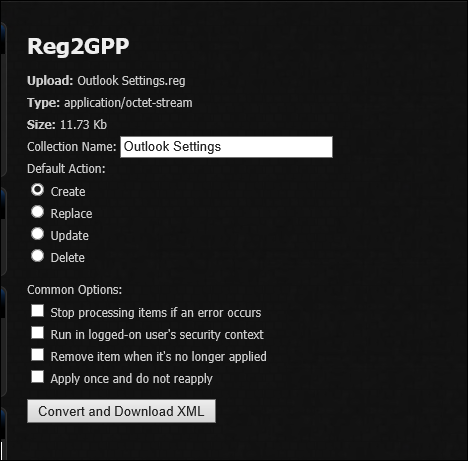
Next we need to convert the .Reg file to .XML using the website below:
When converting the file make sure you select Create, when done save the file.font4
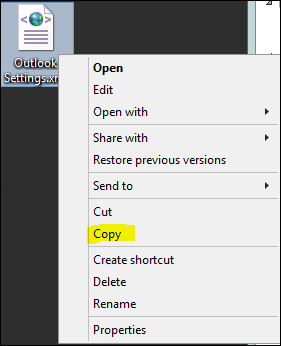
Next right click on the .XML file and Click Copy
font45
Last step open Group Policy editor and go to:
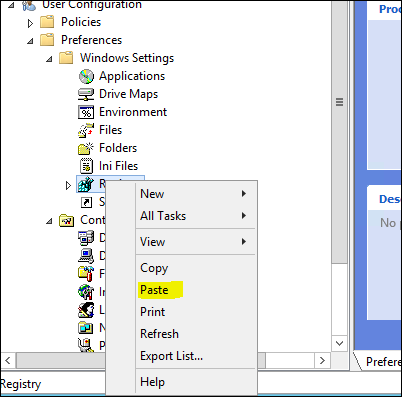
User configuration\Preferences\Windows Settings\Registry
Right Click on Registry and Paste
font5

Share:

1 Şubat 2016 Pazartesi

Offline Files Eşitleme Merkezi Hatalı Paylaşımları Kaldırma

Regedit Run as Administrator

Open up registry editor (WARNING: Only for Advanced Users)
Browse to
HKEY_LOCAL_MACHINE\SYSTEM\CurrentControlSet\Services\Csc

Add a new key (folder) called Parameters
Under
HKEY_LOCAL_MACHINE\SYSTEM\CurrentControlSet\Services\Csc\Parameters
add a new DWORD called FormatDatabase and set its value to 1


You will need to reboot the PC afterwards.
Share:

23 Aralık 2015 Çarşamba

Masaüstüne Dosya Kaydetmeyi Engelleme - Block To Save The File To Your Desktop

Merhaba,

  • Group Policy 'den Computer  configuration-windows settings-security settings - file system'dan add diyelim
  •  %userprofile%\desktop yazalım. gelen ekranda "replace existing permission...." seçeneğini seçip edit security tıklayalım. 
  • Buraya tüm kullanıcıların bulunduğu bir security grup ekleyelim.
  • Bu policy tüm kullanıcı bilgisayarına uygulayalım.


İstediğiniz gibi kullanıcılar masaüstlerine kaydedemeyeceklerdir.

Hello

solution of the desired operation is as follows. 
  • Expand - Group Policy \ Computer \ configuration-windows settings-security settings - file system
  • Select to Add
  • Write %userprofile%\desktop  
  • On the next screen, select to "replace existing permission...." choice 
  • Select  Edit Security tab 
  • You must create new security group and included all users
  • The person you want to apply, this policy, 

Kaynak / Source : http://www.cozumpark.com/forums/permalink/152803/152971/ShowThread.aspx#152971

Share:

31 Temmuz 2015 Cuma

GPO ile Local Administrator Şifresi Değiştirme ve Enable Yapma

strComputer = "."
Set objUser = GetObject("WinNT://" & strComputer & "/Administrator, user")
objUser.SetPassword "Yeni Şifre"
objUser.AccountDisabled = False
objUser.SetInfo

Yukarıdaki kodu logo.vbs adıyla kaydedin. Ardından Sysvol dizinine dosyayı kopyalayın.

Son olarak aşağıdaki sıra ile GPO oluşturup, ilgili bilgisayar gruplarınızı bu GPO ile ilişkilendirin.


Resimler yalnızca GPO 'nun nasıl oluşturulacağına dair bilgi vermek içindir.
Image of start of process to create GPO

Image of Scripts (Logon/Logoff) window

Image of Logon Properties

Image of dropping script into Logon script folder


Share:

Blog Arşivi